Saturday, 25 January 2014

Fish Egg Manicure Tutorial

The fish egg manicure is one of the most popular styles -and I am sure you are going to love it too! It is very easy and looks absolutely gorgeous. Below I will help you achieve the same nail design in only few steps. In order to create it, you will need to buy Ciate Caviar Manicure Kit or some simple micro beads in any craft/art store for only few dollars. You can create this style with the same colour such as below: Pink, or any other colour you like. Start by painting your nails in you chosen colour, preferably more than one layer so the micro beads will stick better.

While the nail polish is still wet, dip your nail into the jar with beads such as indicated below. Press them on your nails gently so they stick better. If in any area there aren’t any beads, with a stick or any other tool you might find, apply some more beads to make it look regular and stylish such as shown below. You can play around with colours as well. You can create a rainbow of colours over your nails by mixing together different micro beads. I find fish egg manicure to be gorgeous but not ideal for everyone, especially for making house chores. Have fun creating this awesome style!

Knotted Braid Updo Hairstyle Tutorial

This is a simple and lovely design that has culture, depth and class. It will go very well with some nice bright colored nails, lovely dress or jeans and tops.

1. Grab the air, and part the hair from just on the side of fringe and grab the remaining hair from the side and pull it back of the head.

2. Began to over lap each other between 3-4 times and making sure that both sides of the hair are pulled tight.

3. With the remaining hair began to plat it all the way down careful and finish it with a pony tail.

This hair will give you a lot of respect, you can do it yourself or even for friend because they will love this when they see this on you and the beautiful thing about this design it can be used for any event and go with any lovely dress or clothes dark or bright.

Easy Elegant Hairstyle Tutorial

Elegant hairstyles usually take time to create but this one I’m sharing with you today is totally different. Not only takes a few minutes to make but also looks gorgeous. As long as you have medium hair length at, this hairstyle is the right one for you no matter the event. Why spending money on beauty saloons when you can easily create beautiful hairstyles by yourself in a very easy way. Start by straightening your hair really good before getting started and then twist the hair around such as shown in the second and third picture.

Place your pointing finger in the middle so you create an elegant look and then secure the hairstyle with bobby pins. I know that some of you might find it hard to secure a whole hairstyle with bobby pins and hairspray. Make sure to choose big sized bobby pins so it keeps the hair better. As you can see, in only five easy steps you can achieve the same look.

How to Make Your Own Makeup Remover Wipes

Makeup remover wipes are a must have for every woman, not only to remove your makeup off your face, but keep your face fresh and healthy. Although makeup remover wipes don’t cost a lot, if you count all the money you spend on them monthly, you will see that the amount is considerable and why spending any money on makeup remover wipes when you can make them by yourself without spending any penny.

What you will need: Microwaveable bowl, Purified water, Coconut oil, Tear-free baby wash, Container with a lid that snaps into place, roll of paper towels, utility knife.

Method: Take the bowl and fill it with purified water. Add 2 tablespoon of coconut oil, and 2 squirts of baby wash. Mix the ingredients together such as shown in the first picture. Place the mixture in the microwave for a few second to warm it up and then soak the roll you previously cut, into the container and then pour some of your makeup remover mixture. Let aside the mixture to soak and then after five minutes remove the cardboard centre. Place the wipes in a closed box which allows you to withdraw the wipes one by one whenever you need them. This is a very inexpensive way of making your own makeup remover wipes.

Stylish Smoky Eye Makeup Tutorial

No matter the event you are attending, smoky eye is going to add glamour and drama to your eyes like nothing you have tried before. Smoky eye makeup can be applied by everyone that has the right tools and some basic knowledge on beauty and eyeshadows, not just to makeup artists. This awesome grey and black smoky eye is a classic one that looks fabulous. Usually smoky eye can be created with any colour but dark ones are the best to make your eyes look deep and intense. You are going to need three different shades of grey. Light, Medium, and Black.

Start by applying foundation over your eyelids, and then apply the lightest shade on the inner corner of your eyes, and then medium light on the mid of your eyelid and then add the darkest colour by the end of the eyelid. Blend the colours well with each other so the makeup looks nice and smooth. Apply black eyeliner, black pencil and that’s how a beautiful smoky eye is done! Simply have a look at the picture tutorial below and you will be able to create this awesome look very easy. This is a perfect makeup for evening events, engagements, weddings, party’s, prom and so. Have fun creating it!

Green and Gold Makeup Tutorial

 A very exotic darkness background illusion that brings all the attention to your eyes. Green being a season top favourite, the touch of gold just blends it all together and the black just brings that touch of class with the eyeliner and the dark lashes to give it that sparkle.

1. Starting with a bit of foundation, apply the brush under the eyebrow covering the whole eyelid and let it dry.

2. Apply the green to the top of the eyelid leaving the corner free.

3. In the corner finish it off the amazing gold.

4. With a thin brush apply a thick black line above the eye lashes going from corner to corner and with the pencil proceed with eye line.

5. Apply lightly on the eye lashes and brush them up carefully.

You will have a lot of fun with this design as it will go with any outfit, shoes and assessors. The number 1 thing it will give you is the spot light of the room with those just grabbing everyone attention it will truly brighten up your night and that lovely outfit

Chic Chignon Ponytail Hairstyle

This is a beautiful chignon ponytail that can be done in only few minutes for all sort of events such as party, birthday, prom, attending a wedding ect. The events that require you to dress up in an elegant way are plenty but not all of us feel confident to go to beauty saloon and spend our hard earned money on hairstyles, especially as there are so many useful hair design tutorials on the web that help you create beautiful hairstyles all by yourself.

In order to create this hairstyle, you will need to have your hair at least at a medium length because short hair are hard to deal if you want to create a hairstyle like this one. Start by straightening your hair with a flat iron and then separate a section by holding it with bobby pins such as shown in the second picture.

Twist it around and secure it with an elastic band by creating a ponytail at the end. Secure it with a bobby pin in the end and your elegant chignon ponytail is now ready. As you can see below, it looks awesome and it took less than 5 minutes to be done (except the hair straightening part that takes awhile). You can put some hair accessories such as flowers or rhinestones to make this hairstyle even more eye-catching. Have fun doing it!

Wednesday, 22 January 2014

How to: Summer Color Block Nails

A very modern retro design you can call this design. Its so beautiful, so colorful and just smells of class. It is so easy to do.
1. Paint the nails white (remember start with a out line and then fill in carefully)
2. Start from the bottom of the nail, put some clear paper just on just above the bottom of the nail and apply the blue and repeat these stage with the orange, blue, purple and pink.
All the colors that are used here are the hot topic for nails this season. They all bring there on flavor to it and you can see how the bright orange brings the blue out, the purple is what catches everyone’s attention and that pink just brings it all together. You can wear it with anything because all the colors go well with jeans and that favorite top or that glamour’s dress you have been dying to wear but just couldn’t find the right nail design to go with it. Well now you have found it so what is your excuse.

Negative Space Nautical Nails Tutorial

This beautiful stripped nail design is different from what you have seen before and that is because of its unique style and colours. It is very easy to follow-not only the picture tutorial below shows you step by step how to achieve the design but I will help you by making a brief description of the picture.

1.Start by applying the base (top coat), preferably transparent but you can use light beige such as used in the one below as well. Make sure to wait a good amount of time for the top coat to dry before getting started with the nail design.

2.Apply striping tape such as indicated in the picture below. Make sure the tape covers you cuticles so the nail polish doesn’t leak and mess up the whole nail design and your skin.

3.Paint the stripes based on your chosen colours. Make sure to make a good combination of colours if you wont follow the one below. Maybe you don’t have all the nail polish colours used below so you want to go for something different, and that’s fine but try to be creative and mix match colours well with each other.

4-Apply top coat after you are done and that’s it really. Very easy and looks absolutely gorgeous! It doesn’t take much time and can be done on both short or long nails.

Black & White Chanel Inspired Nail Tutorial

This beautiful nail design has been inspired from the famous brand Chanel that has been an inspiration to many women worldwide. Chanel symbolises class, femininity, beauty and now you can hold all these on your hand, by painting your nails into this gorgeous nail design. I know that at first it might look hard, but once you see the video and follow the step by step rules , you are going to see how easy it actually is. In the video tutorial you are going to find all the product list and the described technique on how to create this awesome nail design. The black and white combination is a classy one that matches with all your outfit/dresses colours and that suits all events from day wear (work) to special events or clubbing. Enjoy the video tutorial and get your nails ready for this awesome design.

Maroon and White Nail Tutorial

This simple awesome design is so easy to do that the results will amaze you at the end the maroon that has the glitter through it to give it that sparkling attractiveness. The white zebra stripes give it back real ninety’s retro appel.

1. Starting with a outline, go from the bottom of the nail and proceed halfway up and then going back down a quarter of the way. fill it in with maroon nail polish.

2. On the remaining top space of the nail begin to feel it in all with white remembering to start with an outline to make it easier for you to fill in and not make a mess. let this all dry for 10 minutes.

3. Grab a thin nail brush and from the corner of the nail go in about a quarter. Proceed on making a heart circle a half circle, a little bit down from half way draw other half circle and then proceed this step in the top remaining corner.

4. Now is your circles begin to fill them up with more half circles to give it back the zebra affect. As you can see this is a very lovely but not technical design it can be used for big events business meetings business trips party events major events in just a lazy day in or just seen a friend for coffee and after you become confident new be able to do more of your own designs or add more to it.

Purple and Pink Makeup Combination

Purple Lipsticks have been a hot trend for the last few years but we all have a hard time combining it with the right eye shadow colour. I have seen many women only combine it with black eyeshadow or a simple black eyeliner but you can play around with colours and combine your pink lipstick with an awesome purple eyeshadow with a touch of pink eyeshadow on the inner corners of your eyes and make your self look fabulous. I believe this is very intense and eye-catching makeup combination that might not be idea for day wear such as at school or work, but if you looking something for prom, attending a wedding or clubbing on the weekend, then this might be the perfect combination for you.

As you can see in the picture below, the girl in the tutorial has green eyes. Now, this shouldn’t confuse you because purple eyeshadow matches perfectly with brown eyes as well and I know that very good because I have brown eyes myself and just today tested this makeup combination on myself and looks fabulous. Give it a go and I am sure you going to fall in love with this vivid colours that are going to lighten up your face and make you look like a barbie doll!

Orange and Black Patterned Nail Tutorial

In creating this awesome nail design, I got inspired from a patterned material that really got my attention. I love how the human brain can get so creative when it comes to something you really love and enjoy, such as nails in my case. I have been a nail art lover since I can remember and today I am sharing with you all a simple yet gorgeous orange and black nail design that I hope you will all like as much as I do. Start by applying a full coat of orange nail polish and then with a very thin brush, paint the lines in black such as shown in the first picture.

After painting the first lines, go for a second layer to make them bolder such as shown in the second picture. Now the third picture might look complicated but it is not actually. Paint the square shapes such as shown below and then paint another square inside the first ones such as shown in the forth picture. It might give the impression of being complicated but it is easier than it actually looks. Apply a top coat to give a beautiful shine and protection to your nail design and you are done! Repeat the same thing in all of your nails and you are going to see the difference. This is a very eye-catching and fabulous nail design that is worth the time and effort.

S-Braid Hairstyle Tutorial

This has so much to offer and it is not as hard as it looks either. It can be a bit time consuming but the end result well give you so much confidence and truly leave you speech less. You can say this is a new age princess look.

1. Part the hair evenly, start from the fringe (doesn’t matter what side you start from) and began to braid

2. When you have reached half way (or the person that is doing it for you) grab the hair from the other side and began to braid until you have seven lines of hair.

3 . Go down a quarter of the way and began to braid hair on the side you started. Do four lines for that side.

4. Once again go down other quarter length and braid in other four lines and complete the steps on the opposite side a quarter of the way down. If the end result does not surprise you then you must be one hard person to surprise because it is truly amazing and you can wear any dress or clothes and style well just give you this sense of confidence that well make you stand out of any event, party or just going out for dinner.

Spiral French Braid Tutorial

This has given a old style of platting your hair a classic and stylish appeal to it. The design is just amazing in self, with the texture and circle effect truly brings it all together and gives it that whoo affect.

1. Part the hair evenly and then make a ponytail right in the middle of the head.

2. Being to platt the hair from the side of the fringe, split the ponytail down the middle and began to fed it while you platt the fringe.

3. Repeat the steps to the other side.

4. Now when you have finished feeding the hair through the platt. Grab the remaining platts on each side and began to platt them together.

This such a classic platt that should be used more often. It can be used for that job interview because it does have that business, shop attend or whatever job your going for. It can be used to keep the hair out of the way for when your studying or just watching a movie. As you can read this style can be used for any occasion.

Simple Beige Nail Tutorial for Beginners

This simple elegant nail design is absolutely gorgeous and very easy to create. As the title indicates this can be an awesome design for beginners that have just start getting familiar with nail designs. As beginner it is hard to create fancy complicated nail designs that not only take long time to create but the result will never be as you thought at start because it takes time to learn things but this nail tutorial below shall help you get started and fall in love with nail designing.

Start by applying a full coat of beige nail polish in all of your nails. Go for a second coat if needed. With a very thin brush and white nail polish start painting at the end of your nails (French design) such as indicated in the tutorial below. Simply follow the step-by-step guide and you will be able to create the very same design. With the help of a tooth stick add some rhinestones (make sure to deep the rhinestone into glue before you place it).

Apply top coat and you are done! Easy as that. Super fun and easy. I would suggest this nail design to be created into long nails because the French design is hard to create on short nails. I love the beige nail polishes because it gives a clean and professional look. It matches with all your outfit colours and jewelry. Have fun and get started, you’re going to love it!

Romantic Lace Nail Tutorial

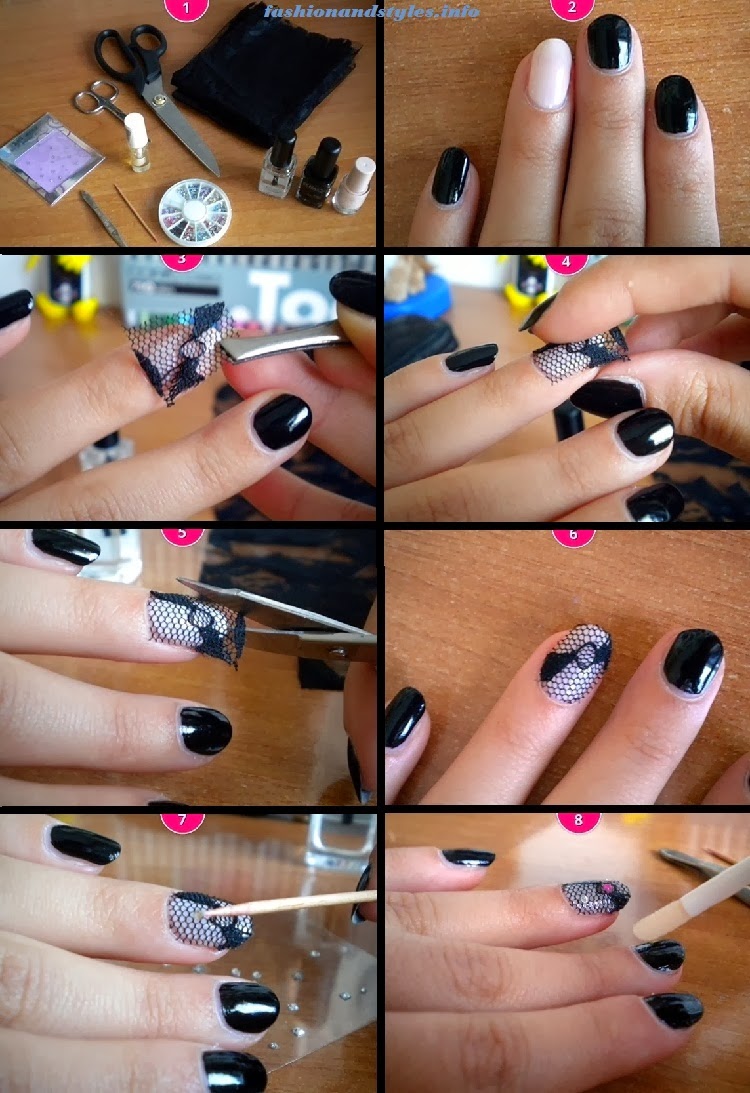
Lace has always being a symbol of sexiness and femininity and who would have thought that it would be possible to create a nail design using lace?! Well, whoever did, must have really been into nail designs because this is gorgeous and with the tutorial below, you will be able to create the exact same design on your nails in only a few minutes.
1-Start by applying a black nail polish in all of your nails except the ring finger.
2-Make sure the black nail polish is totally dried and then apply nail glue on your ring finger and carefully add a piece of black lace on it and gently press on it with any metallic stick or whatever you have access to.
3-After the lace is glued on your ring finger, cut the left overs of the lace with small scissors.
4-Add some small rhinestones in there to make your ring finger sparkle.
And that it is! A beautiful nail covered in lace. This is a very romantic nail design worth trying for special events such as Valentines day or anniversary day, or any other day you feel like spoiling yourself with a beautiful nail design that doesn’t require you to spend any money and that makes your nails look very feminine. If black is not your favourite colour and you don’t really like painting your nails in black, then feel free to create the same nail design but with different colour. Just make sure to add same colour lace because that would ruin the looks. In my opinion this nail design would look ideal in white for your wedding day. Try it now and share with us your final result. I am sure you will all going to love it as much as I do!

Tuesday, 21 January 2014

Black and Glitter Nail Tutorial

This is so much fun and it just works with clothes, events, family gatherings and the list goes on. I do say that blacks works so well this pattern and texture because black is so usefully with it giving that shinny reflections and making the grey sparkle to stand out and blend in. I suggest that you use a see through paper so you can place into the edge of the nail on both sides.

1. Use Paper Craft Scissors, thin see through paper and being to cut out your designs. I will recommend that you make as many different, outstanding designs and just play around with it.

2. Paint the outside of the nail (just make a boarder around the nail) and being to paint it in and let it dry out .

3. Now with the design you have chosen, place it on top of nail and flatten it out until satisfied. Carefully place the grey nail polish on the exposed bottom area.

Let it dry and you have this simple yet affect fun design for your nails. After you get us to it you can being to add different colors and accessories to it.

Arrowheads Pattern Nail Tutorial

Are you a fan of patterned nail designs? If so, then have a close look to this gorgeous nail design that is being done in a very short amount of time, without the need of any special skills.
In order to create the same nail design you will need two different nail polishes, in the tutorial below you can see that the colours used are gold and black. I find this to be a great match that is both classy and fabulous.
Start by applying a full coat of gold nail polish and then with the help of a very thin brush, paint a straight line of black nail polish. After you paint the first line, repeat the procedure until you get the same look as the picture number 1. You can use a tape if you having a hard time painting straight line.
After you have painted the horizontal lines on the first picture, start painting the second lines such as shown in the picture number two. Repeat the same thing but on the opposite side of your nail and then with the thin brush you used to paint the lines, start filling the triangle shapes such as indicated on the forth picture.
This is very easy to do but it might require some time to do it, considering you have to paint ten nails in this design. Or you can apply this design only on your ring finger and keep the rest of your nails in gold. Whatever you choose, I can assure you that is going to look awesome.

Nail Art How To: Turtle Shell Gradient Nails

This is a gorgeous tutorial that will make your nails look awesome and colourful. Although it might look hard when looking the tutorial at first, if you carefully follow the steps one by one, you will realise how easy it actually is and how your nails are going to look feminine and fun. Start by applying a full coat of white nail polish in all of your nails and while that being dried, take some scotch tape and place it around your nails (on your cuticles) so you wont spend time cleaning the nail around you because in case you haven’t tried nail tutorials using sponge before, let me tell you, it can get a bit messy.

In a small piece of sponge add four different colour of nail polish (whatever colours you might have chosen). Below you can see that the chosen colours are yellow, blue, purple and green. Place the sponge in each and every nail carefully and once that is being done, safely remove the tape off your nails. With acetone and cotton swabs clean the nail around and then paint the polish on to the stamp plate, make sure to cover the entire design. Scrape the excess polish from the design. In a rolling motion, press the stamper on the plate to transfer the design. This is easier being done if you keep your hand pressed in a surface (table for example) so the stamper can really be transferred on your nails. Apply a glittery nail polish at the end and that’s is it! A beautiful nail design in only few minutes. Give it a go and find out by yourself how easy and how good it actually looks.

Monday, 13 January 2014

Black Manicure and Golden Stripes Tutorial

You can do so many different designs to meet any occasions with this wonderful and beautiful idea. Just have a look how good the black and gold go in so many different ways. The black itself is has dangerous sexy affect and the gold really does just bring it all together. You will be surprise with the ideas that you come up with. So with no time to waste I will tell you how to do it.

1. Start with making a outline around the nail and then feeling it in with the black nail polish. Let it dry and make any necessary clean ups or fix ups.

2. Now with the gold ribbon (don’t forget it is up to you how thick you want the ribbon) being to let your mind run wild with your ideas.

I would suggest to play around with this design until you feel comfortable with what you are trying to archive.

Double Lighting Bolt Nail Tutorial

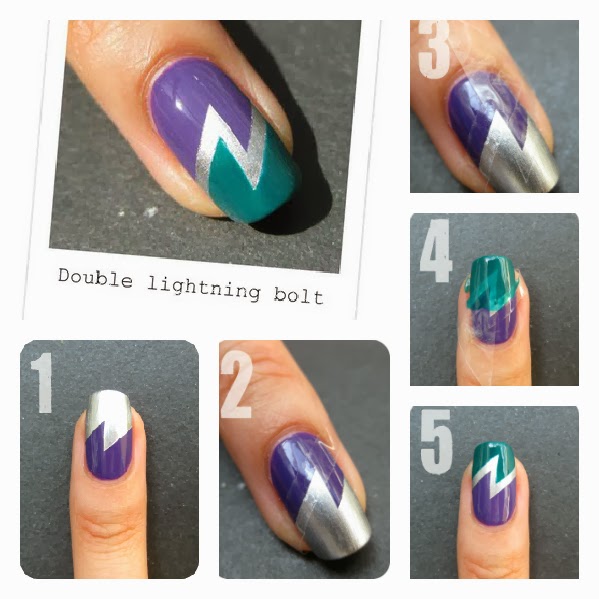
This is not the first nail tutorial I bring to you that is done with the help of tape but that is because tape can minimize the time you need to create any nail design and of course, costs nothing and you can use it to create all sort of nail designs.

In creating the exact same look as in the tutorial below you will need three nail polishes: purple, silver and dark green. This is an awesome look for all different of seasons and if you don’t have the colours shown below but you feel comfortable by matching other colours such as red and black or gold and green, the go ahead and play around with colours. Start by applying a full coat of silver nail polish in all of your nails and then after the silver nail polish is completely dried add two different pieces of tape such as indicated in the second and forth picture. This is a double lighting bold nail design that is totally different from what you have seen before and is going to make you fall in love with it.

If you like to keep your nails simple, you can create this look with beige and gold nail polish. This is one of the simplest nail designs you can possibly try. What are you waiting for? go get the tape and start creating this awesome design on your nails.

Butterfly Nail Tutorial

Butterflies are the most beautiful creatures that makes everyone admire their beauty, colour and glamour while they fly away in the endless sky…and that’s what has inspired many nail art loved to create the arms of the butterfly into their nails. I absolutely love the idea, wish I could have thought it myself first but unfortunately this is not my original idea but you can find it easily on the web so whoever did it first, we are grateful!

This nail tutorial consist on beautiful purple and black butterflies that are going to make your nails look gorgeous. All you will need to create the exact same nails is a purple nail polish and a black manicure with a thick brush to paint. Start by applying a full coat of purple manicure over your nails, and then get ready your glitter purple manicure to apply on top if you like. In this picture below you can easily see the use of two manicures, one over the other but if you like to keep it simple, you can start painting the butterfly over the first coat of nail polish. Look at the tutorial below in order to create the best butterfly arms with the black manicure and once you are done with it, make sure the black manicure is dried before you add the white dots.

And that’s it! The result is stunning and it only takes a few minutes to create them. If you like, you can add small nail accessories to make your nails sparkle even more. Have fun creating them and let the butterfly inspire you!

Friday, 10 January 2014

How to Make Lovely Purple Nails

This is a super easy way on making lovely purple nail design in only a few minutes without trying hard. Usually, nail designs we see on the web or beauty saloons, really take time to create-but not this one. Purple is a colour that can be applied onto your nails no matter the season but the good thing is that if you don’t have any purple nail polish, then you can create the same look with different colours but purple is highly recommended if you want the exact same nails as shown below. In making this nail design you will need three different shades of purple nails polishes (start from the lightest to the darkest one such as shown below) and a sponge.

Apply a white nail polish over your nails and then after that is totally dried take the sponge and carefully add three layers of purple nail polish such as indicated below. It will probably get a little bit messy around your nail but nothing to worry; that can be taken off gradually when you wash your hands or use polish removed to clean the skin off the nail polish. You can either add a top coat or transparent gel , or if you don’t have any, simply let your nails dry and you are ready to rock the new stylish purple design over your nails. This is a great idea that has been used for long now but in case you never heard of it before, the picture below shall help you achieve the best look.

Black and Glitter Nail Tutorial

This is truly a amazing idea something so simple that I am surprised it never came out earlier and how it gives the black such detail, charisma and it is so easy to do.

1. When you have down all the pre work on your nails, being to paint them black and keep in mind it easier to do the outline of the nail first and then fill it in.

2. You can buy this brush online, beauty shops, chemist or just down your local supermarket. Grab the brush and apply the sparkle nail polish and being to lightly brush the nails. (its up to how much want to apply)

3.Let it set and dry.

I truly believe this is a fun and cool design. Its fun, quick and simple look with a bit of interesting test.

Rainbow Striping Tape Nail Tutorial

The use of striping tape seem to have gotten a huge popularity on nail designs and that is for the simple reason that striping tape makes things way easier for you when you want to create a colourful design such as the pone shown below. Some women choose to paint their nails with small brushes but that takes ages, while striping tape does the very same thing but in less time. In order to create this awesome nail design you will need tape cut into strips, white nail, yellow, blue and purple nail polish.

1-Start by applying a full coat of white nail polish on all of your nails and after making sure the white nail polish is totally dried, gently add the striping tape such as indicated in the tutorial below (both vertically and horizontally).

2- Take all three of the other nail polishes (yellow, blue and purple) and apply it such as indicated in the tutorial below. Let it dry and slowly removed then striping tape off your nails and then apply transparent gel or top coat to finalise your nail design.

Note: you can do this design by using all different nail polish colours; just make sure the colours are in contrast with each other so you can make your nails eye-catching and fabulous! Have fun creating this super easy, stylish nail design for all different events.

Midnight Metallic Nail Tutorial

Glamorous dark nails are my favourite of all, although they might not be everyone’s favourite, this design I am about to show will make you love the midnight manicure colour even more! this is a beautiful design that is easy to create and looks absolutely fabulous. Start by applying the base coat (any nail strengthen or transparent manicure will do just fine), or you can apply directly the midnight manicure. Make sure to apply two coats of midnight nail polish because one might not be enough to give the intense look you desire. Make sure the first coat is totally dried before applying the second one because you might ruin the nail. In a metallic piece of paper, add a few drops of metallic nail polish and then deep your ballpoint sculpting tool in there and randomly add the polka dots over your nails such as shown in the picture tutorial below.

Do the same thing with the gold nail polish and then carefully add the glitter over the polka dots you previously applied. Finish the design by applying a transparent gel or nail polish to give your nails the shine and beauty that it requires. This is a perfect design to wear not only for these cold winter days but any other season. I believe that short nails look awesome in dark colours and If you have short nails like me, then feel confident to apply this design and make your nails look fabulous. Have fun creating it! It only takes a few minutes and you will feel confident to show your creative design to your friends and loved one.

How to Create a Stylish Bun in 4 Steps -Hair Tutorial

Other classic princess look that it so simple and quick to do you would be amazed by the effort and time it would take you to do, oh and the effect it has on you is amazing.

1. Tie the top layer of hair into a pony tail and being to wrap it around it self until you get the bun ( but use what ever technique you feel comfortable with).

2. Separate the bottom half until you can see or feel the skin line in the middle of it.

3. It doesn’t really matter what side you start with, just grab it, wrap around the bun and do the same with the other side.

4. Straighten up until you are happy with it.

You can wear this for dinner partys, events etc. goes well with any dress and you can add pins, bun tie etc to brighten it up.

Layered Twist Around Hairstyle Tutorial

Elegant hairstyles are the best choice both for weddings or special event. Is no secret that achieving such a hairstyle might require a pro or someone that is good at styling hair but with the right tutorial, now everyone can achieve this awesome look. Getting married is a very special day, and as such women want to look at their best but when you are having a simple wedding with only a few close friends at the yard of your house with a low budget, going to beauty saloon might not be idea but that shouldn’t be a worry because in only few easy steps you can create a gorgeous hairstyle and as for makeup, you can have a look at some of the old articles with the best makeup tricks and tips ever.

In order to achieve this look you need to have long hair. Now not all of brides have long hair but all brides or young girls that want to create this hairstyle will definitely need to have long hairs. You will need some elastic bands, a brush and of course so hair spray to keep your hairstyle in place. No matter the event, you can create this easy hairstyle and look gorgeous. Actually a great idea would be if you add some hair clip accessories on there as well. Have fun creating it and don’t be afraid to show off your awesome hairstyle!

Braided Bun


This braid might look a little difficult but is actually pretty easy if you follow these five simple steps!

We think this updo is absolutely gorgeous and gives you a sophisticated look. If you have any events coming up, you can’t go wrong with this braid.

1. Split the hair into five equal sections. The two sections that are closest to the ears should be higher then the rest.

2. Braid each section all the way to the bottom and secure with a small (preferably clear) elastic.

3. Take the three middle braids and braid them into one regular braid.

4. Twist the big braid into a bun, and secure with bobby pins until it feels tight.

5. Then, add the two braids remaining from each side, and wrap them around the bun. Secure with more bobby pins.

Sunday, 5 January 2014

Wedding Hairstyle Tutorial

As you can see this is a job for your best friend, friend or the hairdresser. Its a pretty simple style but as you can see from the end result it has that princess affect that we all desire for deep down and of course its very tidy and has class.

1. Separate the hair, pin the top half and place the bottom into a pony tail.

2. With hair in the pony tail, use hair spray and a brash. Being to give it the fuzzy affect.

3. Now being to roll it up into a bun, leave a little bit of hair to tie it up going around the hair tie and tuck it back into the top of the tie.

4. With the top bit began to make a plat on the side of the bun, grab the remaining part of the hair and began to wrap it around the bun.

5. with the place it from ear to ear and tuck away into the bun.

As you can read and see it is a very simple hair style with big affects. It goes well with a very nice dress and pair of earrings.

Upside Down Braid

We’ve already given a tutorial for this braid, but this time we’re including pictures to show you each step!

We hope you enjoy this braid! XOXO

Step 1:

The person who you are braiding needs to put their head down so that all the hair is falling forward.

Step 2:

Take a small piece from the bottom of the neck (which will be the top of your braid). The whole time you will be braiding like a regular braid from top to bottom).

Step 3:

Begin braiding the classic French braid. Split the piece of hair you took into three pieces, and as you braid, add more and more pieces from the right and left sides of the hair. Make sure to make it tight for better results.

Step 4:

Continue braiding until you have reached the ear line in the back of the head. Once you reach that point, stop adding more piece of hair and add the rest of the hair as if you are making a high ponytail.

Step 5:

Use a ponytail to tie all the hair together into a high ponytail. Now you can choose to either leave it down in a ponytail or wear it in a bun so the braid is visible!

Braided Hairstyle Tutorial

This a very classic way of braiding your hair, it is easy, simple and very quick to do if your in a rush for work, special events or just a simple day in. Just need one clip. I believe that braids are the hottest trend when it comes to hairstyles and If you haven’t tried one yet, or maybe you have tried but haven’t like the style, today I am going to show you an amazing hairstyle that is going to make you fall in love with it. Simply follow the picture description below for an awesome looking braided hairstyle

1. Grab a handful of hair on the side of your head, separate into 3 lengths and being to plat all the way done.

2. When you are happy with the plat you have just did, grab the end, swing it around the other side,put the end underneath the hair and clip it in. No will tell that the clip is in and will be stun by this classy and beautiful tie.

Wednesday, 1 January 2014

Tiny Double Headband Braid


This braid is so easy to make, and we love it because it’s doable on yourself.

I love wearing my hair down, so this hairstyle makes it look a little more interesting.

Here’s the step by step. Enjoy!

XOXO

Step 1: Part your hair however you like it.

Step 2: Take a small piece of hair from behind the ear from each side of the head.

Step 3: Braid those small sections all the way to the bottom.

Step 4: Bring one braid over to the opposite side of the head, securing it with bobby pins behind your ear where it is not visible. Do this to the other side as well.

Step 5: Bring some hair to the front to give it the full headband effect!

Watercolour/Marbling Nail Art

This is a new technique of painting your nails in an amazing and easy way by using a plastic bag such as shown in the picture below. I am sure you have all heard about nail marbling and how for some it looks so complicated but this one that I am sharing with you today, is totally different! Not only takes few minutes to create but actually looks unique and stylish. All you need to create this gorgeous nail design is white base, a simple plastic bag and three different nail polish (whatever colours you might like).

Start by applying a full coat of white nail polish over your nails and after that is totally dried, apply the three different nail polishes wherever you like. It doesn’t have to look sophisticated because you will put the plastic bag on top. Don’t let the nail get dry, as soon as you apply the three nail polishes, add the plastic bag on top and mix everything together. It might look a bit messy at start but after you take the plastic bag off clean the nail around, apply a transparent nail polish or gel on top and you are ready to show off your new awesome marbling design to your friends. Enjoy!

Snake Braid

In this tutorial we will teach you how to make the very simple Snake Braid.

If you know how to make a simple braid, then this should be very easy!

1. Part your hair the way you like it.

2. Take a piece of hair (not too big and not too small- about an inch thick for best results). Braid into a regular three-strand braid, preferably all the way to the bottom.

3. When you get to the end of the braid, combine two of the strands, holding them together so that you have 2 on one side and 1 on the other side (look at picture).

4. Holding the single strand tightly, slide the other 2 strands tightly all the way to the top of the braid. It’s okay if the braid seems a littl emessy at this point. You will be able to fix it after the next step.

5. Once the two strands are all the way at the top of the braid, gently spread them out to get a snake looking braid, and you’re done!

Double Crown Braid

1. Divide the hair into two equal sections.

2. Take a small piece from the bottom of the left section, and start braiding (in this tutorial we made an inverse braid, but French braid works as well).

3. Braid all the way around the left side of the head, gradually adding more and more pieces from the left section until you reach your part at the top of the head in a semi-circle. At that point, all of the hair from the left section should already be included in your braid.

4. Do the same thing on the right side, and complete the updo by using bobby pins to secure the crown braid.

Beautiful Hair Style Tutorial Using Scarf

The usage of scarfs into hairstyles are very common, especially during spring and summer! Although you probably have seen all different scarfs and hairstyles on daily basis, I bet you haven’t seen the one I am about to show you below. You can choose any colour you like (and matches your outfit) and make your hair look fabulous. Although when you see the tutorial below you might see too many small picture and think it takes too long to create it or too complicated, in reality it is not!

All you need is medium or long hair, a scarf, a hair curler to curl your hair and that is it! Simply follow the tutorial below step-by step and you are ready to create the best hairstyle of your life! Save this tutorial on your Facebook so you can search for it once summer come because you are going to love this hairstyle in the beach or when going around with your friends. Have fun creating and make your hair look fabulous and trendy with this simple hair guide below. Have fun!